How to Create Audio Description for Youtube Videos
Create Audio Description for YouTube Videos
More than 1 billion hours of videos are watched on YouTube each day.
71% of people with disabilities leave a website immediately if it’s not accessible.
You don’t have to be a mathematician to understand these stats and their implications. If you want your YouTube videos to reach their full potential, you need to make them accessible with captions and audio description.
But how?
Until 2023, YouTube didn’t support audio description in the same way it supported captions. For captions, users could upload an SRT file with their video, but there was no similar solution for audio description. This meant that if a user was going to add audio description, it had to be embedded into the video and uploaded as one version.
However, YouTube recently launched the ability to add audio description tracks to videos—a win for media accessibility! While the audio description capabilities are not available to all users yet, YouTube indicates that they will continue to roll this feature out to more creators.
If you want your content to reach the millions of people who are blind or have low vision, keep reading to learn how to create and add audio description to YouTube videos.
How to Create and Add Audio Description to YouTube Videos
The two most common ways to add audio description to YouTube videos are to create descriptions manually or use an audio description vendor.
Going the DIY route will be a far more labor- and time-intensive process; however, there are some workarounds for adding audio description to your YouTube videos, which we’ll discuss in this blog.
On the flip side, you’re guaranteed high-quality, accurate descriptions when you go through a professional audio description vendor like 3Play.
Our professional describers watch your video and utilize technology and human editing to create clear, accurate descriptions that follow the DCMP guidelines. The descriptions, using synthesized speech or professional voice actors, are placed using the existing timecodes from your caption file so that they don’t disrupt the viewer from the original audio track.
Get started with audio description ➡️
Outsourcing to 3Play Media
Step 1: Order Audio Description
Begin by logging into your 3Play Media account.
To order audio description, you must first order transcription.
Select Order Services at the top of the screen, and select Transcription & Captioning as your main service. Choose your preferred turnaround time, and click next to continue.
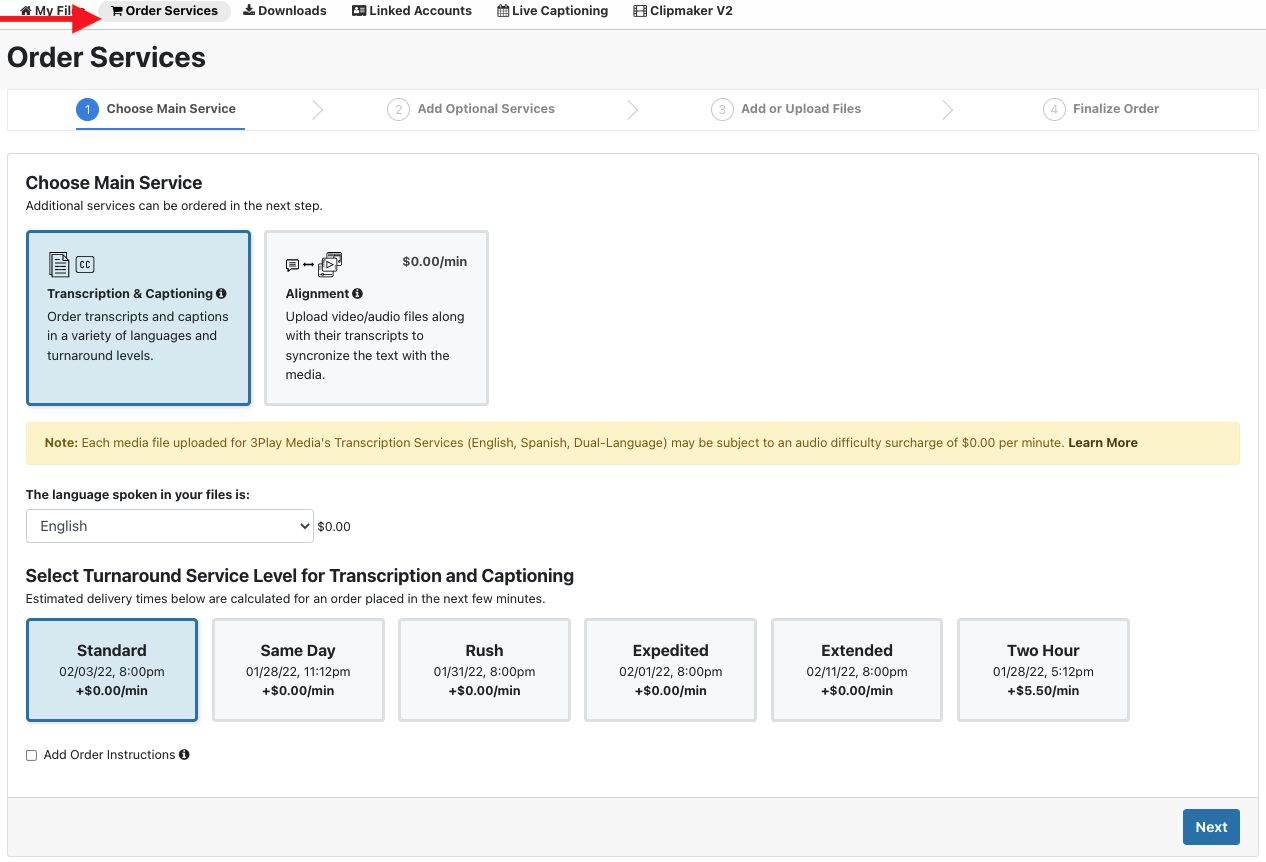
Select Audio Description as an additional service. Choose your preferred service level and turnaround time, then click next.

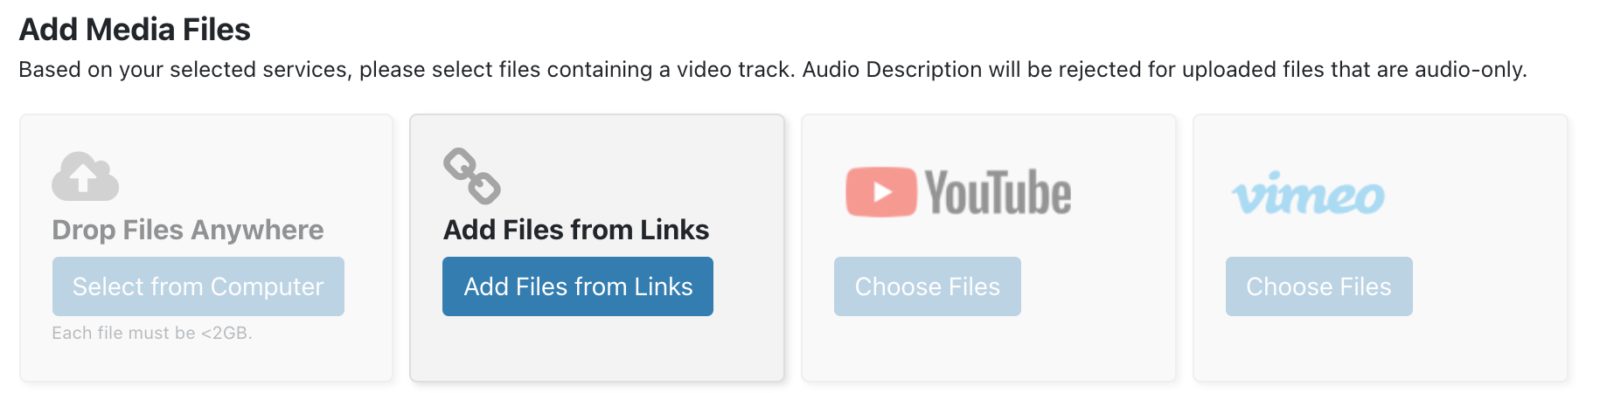
Select the method you are going to use to upload your video. From Links is a great option for YouTube videos, especially those you don’t own. Copy and paste the video URL, click Add Files, then hit next.
Review and submit.
- If you already have a transcribed file from a YouTube video in your account, navigate to the file for which you want audio description, click on the file name, choose Order More when the menu appears on the right of the screen, and choose Audio Description. Follow the prompts to place your order.
- If you already have an audio description file from a YouTube video in your account, continue to Step 2.
Step 2: Add Your Audio Description File to Your YouTube Video
Once you have your 3Play Media audio description file, you can either upload your YouTube video with the audio description track embedded or, if you have the ability, add the audio description to your YouTube video as a separate track. Here are the steps:
- Sign in to YouTube Studio on your computer.
- From the left menu, select Subtitles.
- Click the video that you’d like to edit.
- Click ADD LANGUAGE and select your language.
- Under “Audio,” click ADD.
- Click SELECT FILE.
- Choose which file to upload. Files must be in a supported audio-only file format and roughly the same length as your video.
- Click PUBLISH when you’re ready to upload your audio track.
DIY Method
Choosing to create descriptions yourself will take ample time and effort. However, depending on your workflow, this may be a suitable option for your organization.
First, you’ll want to create an audio description transcript. The transcript is a text document that includes both the descriptions of the visual elements and the captions of the original audio.
The audio description transcript will allow blind and low-vision viewers to use their screen readers. Not only will they understand the original spoken audio, but they’ll also be able to get a picture of what’s being visually depicted in the video.
Although this option is better than not having audio description at all, it’s best to have the descriptions in the actual video because it improves the viewer experience. Blindness isn’t all or nothing. In fact, many blind people still have some vision, even if it may be a small percentage. The transcript wouldn’t allow viewers to watch the video and read it simultaneously.
However, you could use the transcript to record the descriptions for your video! When you have the timecodes of the captions, you’ll know precisely where the natural pauses between the dialogue are located. This will make recording the descriptions a breeze since you know exactly where they should go.
If you decide to go with just the transcript instead of recording the audio description, we recommend putting it in the description box below the video or linking it to a separate URL.
The Access Player and the 3Play Plugin
Since not all YouTube have access to YouTube’s new audio description feature, 3Play Media’s Access Player and Plugin remain great options for publishing audio description.
The Access Player is 3Play Media’s new, fully accessible media player that integrates with your existing media player of choice to add enhanced accessibility capabilities.
The Access Player allows the user to search and interact with a time-synced transcript and listen to an Audio Description track. In addition, it provides SEO benefits, making your content more discoverable –so you can reach and connect with your audience to the fullest extent possible.
The 3Play Plugin is still available as we continue to build out the functionality of the Access Player. If you’re looking for extended audio descriptionx support, the 3Play Plugin integrates with your player and intelligently pauses the source video content until the description is complete before resuming play.
Using the 3Play Plugin
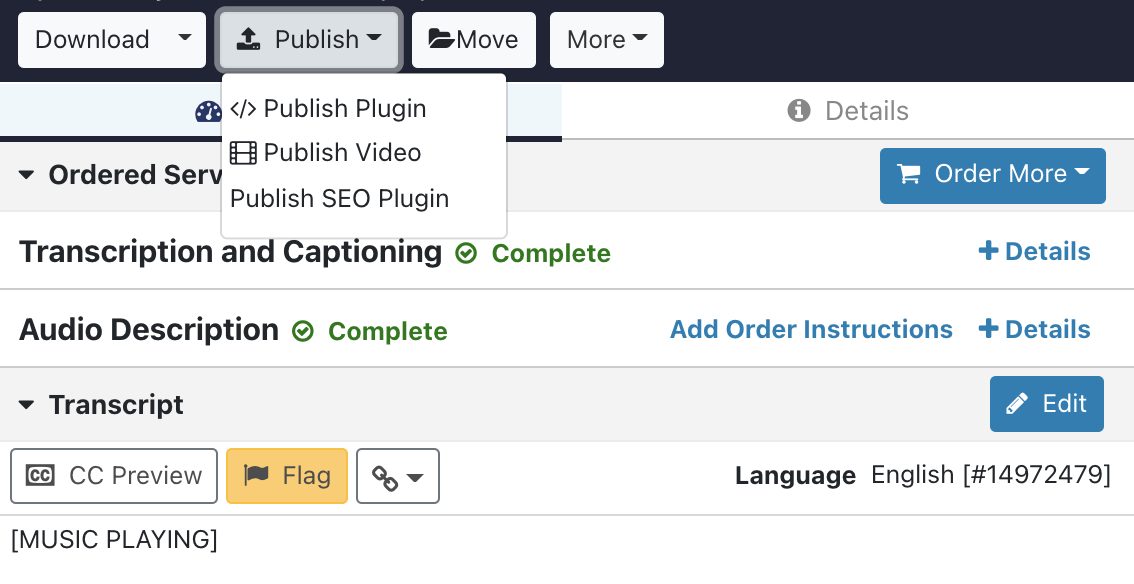
Once you have a completed Audio Description file from a YouTube video, click on the file you want to publish. Select Publish from the top right window, then Publish Plugin. The plugin menu will open. Select Audio Description and any other features you want included in your plugin, and choose YouTube as your video player. You will see a preview on the left side of the menu window.
Next, copy the single line embed code provided, and paste it into the bodyof your HTML.

Your video will now appear with the YouTube audio description plugin underneath. You can toggle the audio description on or off and change the volume of the description separately from the volume of your original audio track. Try it out:
Make your YouTube videos accessible! Get started today with audio description:
This post was originally published on July 23, 2018, by Elisa Lewis and has since been updated for clarity, accuracy, and freshness.
Further Reading


Subscribe to the Blog Digest
Sign up to receive our blog digest and other information on this topic. You can unsubscribe anytime.
By subscribing you agree to our privacy policy.