


- Captioning
WebVTT Captions: How to Create a Web Video Text Track File
•

Create your own WebVTT Files [Free Guide]
A “Web Video Text Track” file, also known as WebVTT (.vtt), is a popular subtitle and caption file format. WebVTT was created in 2010 by the Web Hypertext Application Technology Working Group (WHATWG) to support text tracks in HTML5.
WebVTT was broadly based on the SupRip format, another popular caption format, and was even called WebSRT with the same .srt file extension. Later, it was renamed WebVTT and introduced with the tag for HTML5.
How is WebVTT different from SRT?
- Unlike the SRT format, WebVTT allows for description and metadata information to be included within the frames, which is not displayed to the viewer.
- All WebVTT files start with the line “WebVTT,” while SRT files don’t use an SRT distinction and instead begin with a “1” for the first caption sequence.
- In an SRT file, frames need to be separated by cue identifiers. In WebVTT, cue identifiers are optional.
- In a WebVTT file, the timecodes are separated by full stops rather than commas.
- WebVTT files must have a UTF-8 encoding, which is not required in an SRT file.
- WebVTT files can support additional information, such as frame placement.
What are the components of a WebVTT file?
A WebVTT file has two requirements and many optional components.
The two requirements are:
- WEBVTT at the beginning of the transcript.
- A blank line in between each caption frame to indicate the end of a sequence.
The optional components are:
- A byte order mark (BOM) telling the reader the file is encoded with UTF-8. An example of a BOM could be EF BB BF.
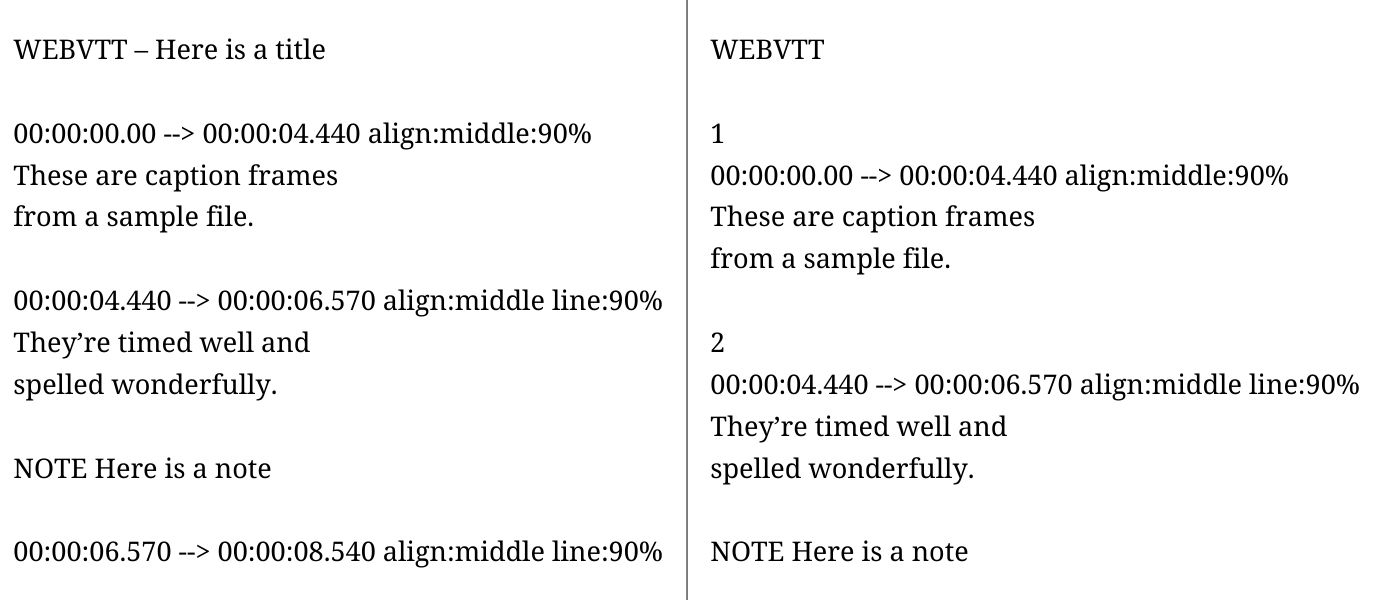
- A header to the right of the WEBVTT. There must be a single space between and must not include a newline or “– –>”. You can use this to describe the file.
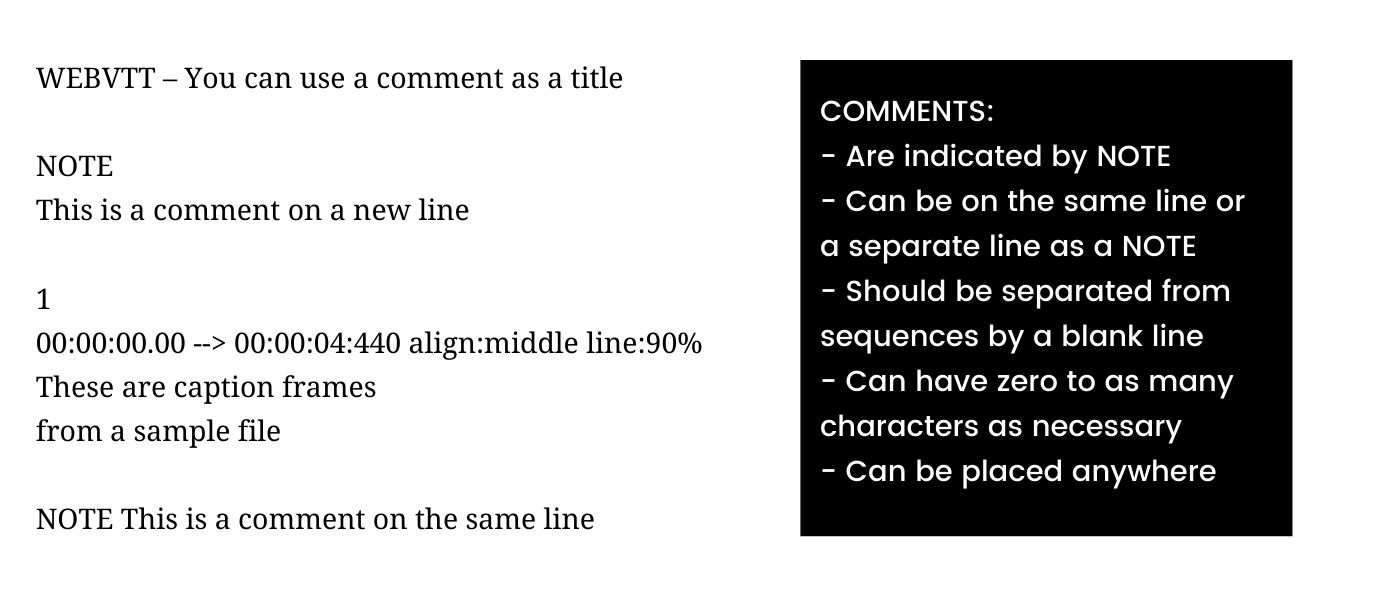
- Comments: indicated by NOTE and on separate lines.
- A sequence number to help keep captions organized.
- Positioning information on the same line after the second timecode.
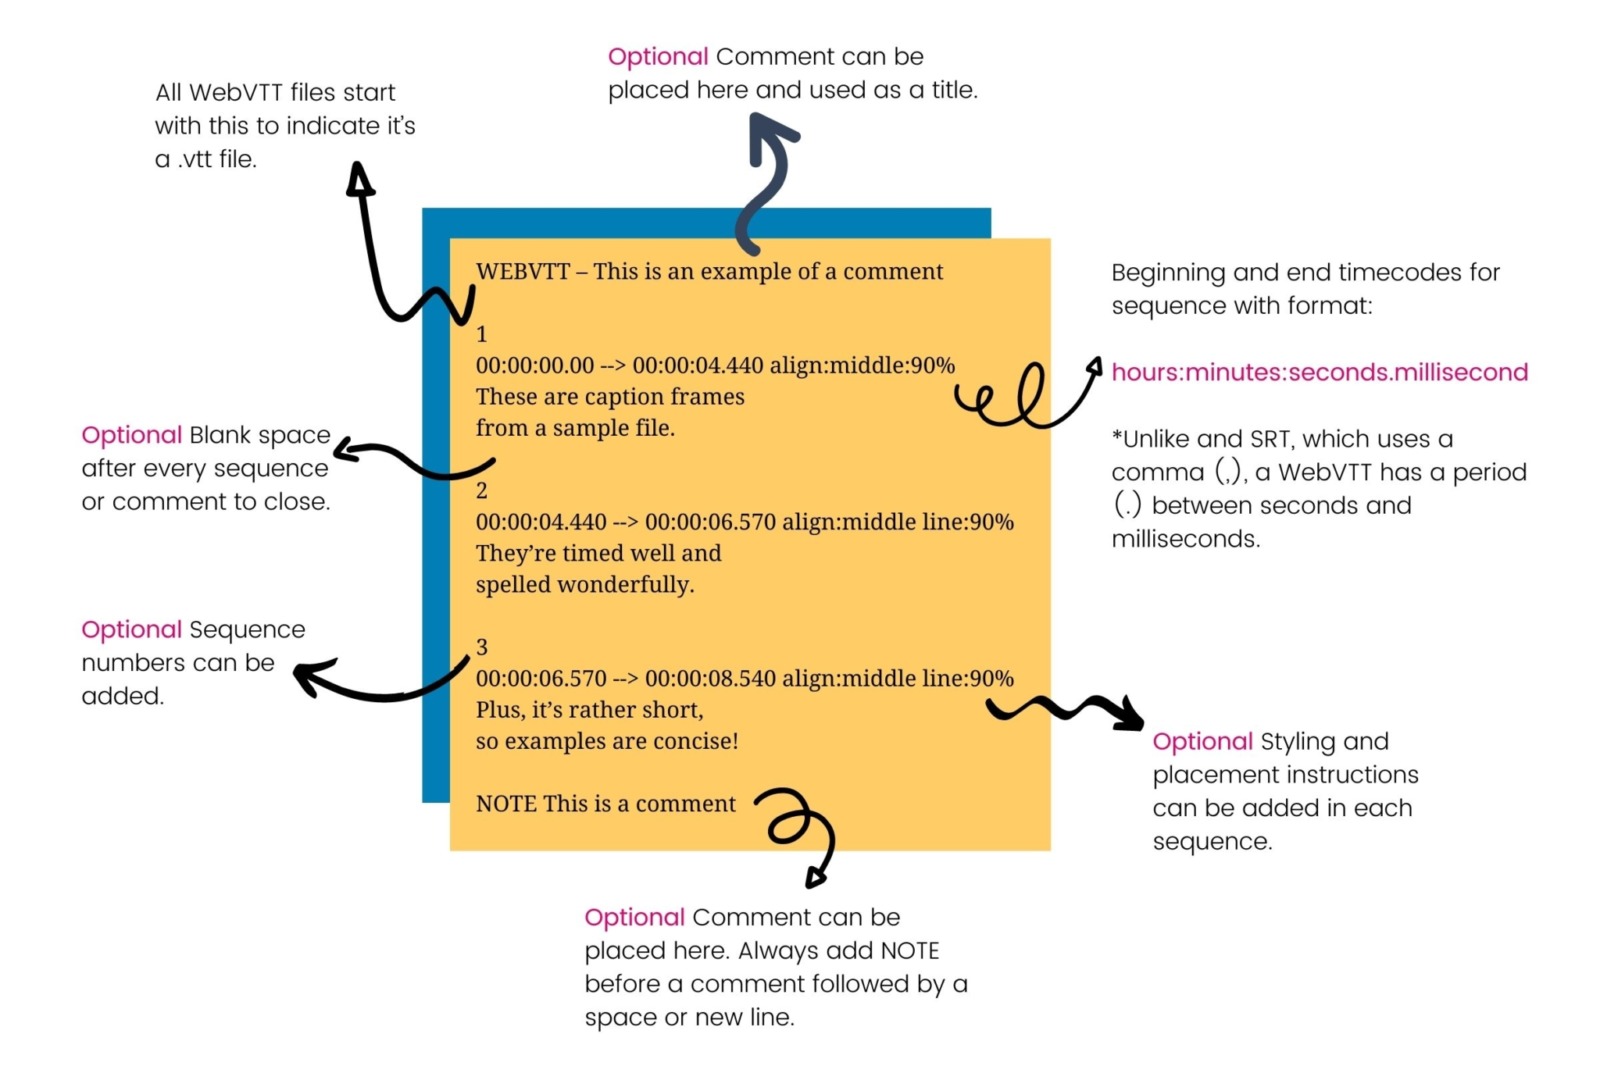
All sequences begin with a timecode. The time format used is minutes:seconds.milliseconds or hours:minutes:seconds.milliseconds, with the milliseconds rounded to 3 decimal places. A two-hash arrow separates each timestamp (“– –>”).
You can use a hyphen to indicate the start of a caption, such as:

Keep in mind that you do not want to have blank lines within a caption sequence. A blank line indicates the end of a sequence and should only be used to separate the captions in different timecodes.
Comments can be added, and the end-user will not see them. You can use comments to describe a file or keep reminders within the file. Comments must start with NOTE, followed by a space or a new line. Similar to a sequence, you cannot have a blank line between a single comment. You can include as many characters as you need within a comment.
Comments can look like this:
Cue settings indicate the positioning of the caption. These are added after the second timecode with a space in between. You can use cue settings to indicate where the captions will be placed and positioned. You can also indicate the width of the text area and alignment of the text. You can also use cue settings to make the text bold, italic, or underlined.
Here is an example:

Track tags are used to specify time text tracks. You can define the type of track with a “kind” attribution. There are five kinds: subtitles, captions, descriptions, chapters, and metadata. By default, a < track > tag will be a subtitle unless defined otherwise.
Create your own WebVTT Files with our free guide
Why should I use a WebVTT file?
WebVTT is a popular captioning format. The benefit of using WebVTT is that you can add additional information such as frame placement, styling, and comments.
WebVTT is also the format choice for HTML5 video.
Some of the most common platforms that use WebVTT are:
How to create your own WebVTT file
You can either create a WebVTT file yourself or hire a professional captioning company. With a professional service, you can avoid having to figure out timecodes or worry about positioning. If time is a constraint, a professional vendor is a great option.
If you decide to make captions yourself, follow the steps below to create your own WebVTT file from scratch. The instructions are slightly different depending on the operating system you use (Mac or Windows PC).
For Mac users:
- Open a new file in TextEdit.
- First, type “WEBVTT” to indicate this is a .vtt file, then press enter twice to leave a blank line. Note: You can include a title or comment before your caption sequence. If you decide to include a comment, either do it on the same line as “WEBVTT” or press enter and start a new NOTE. Enter the beginning and end timecode using the following format:
hours:minutes:seconds.milliseconds –> hours:minutes:seconds.milliseconds 
- If you choose to add a sequence indicator, such as a “1,” do so on a separate line above the timecodes. Then press “enter.” Note: To add cue settings, put a space between the second timecode and add position, size, alignment, etc.
- In the next line, begin your captions. Try to keep a 32-character limit with 2 lines per caption so that the viewer doesn’t have to read too much and the caption doesn’t take up too much screen space. Also, make sure your captions are compliant with captioning guidelines.*
- After the last text line in the sequence, press “enter” twice. Make sure to leave a blank line to indicate a new caption sequence. Here are two examples of the same WebVTT file. You can see how to use comments, sequence numbers, and cue settings.
- Repeat the steps until you have a completed transcript.
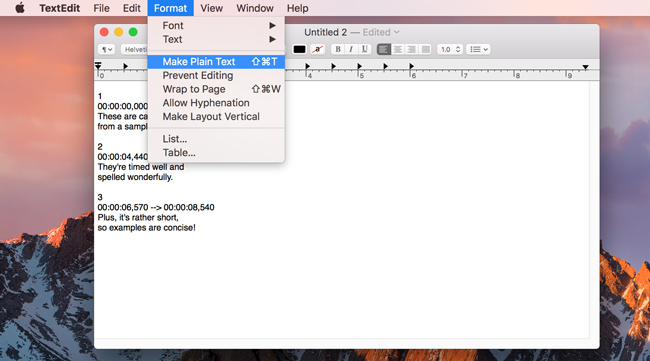
- To save your file as a .vtt, go to Format → Make Plain Text or use the keyboard shortcut: Shift + Command + T.
- Next, go to File → Save.
- Under “Save As,” type the name of your file but switch “.txt” to “.vtt”
- Uncheck both “Hide Extension” on the bottom left-hand side of the menu. “If no extension is provided,” use “.txt”
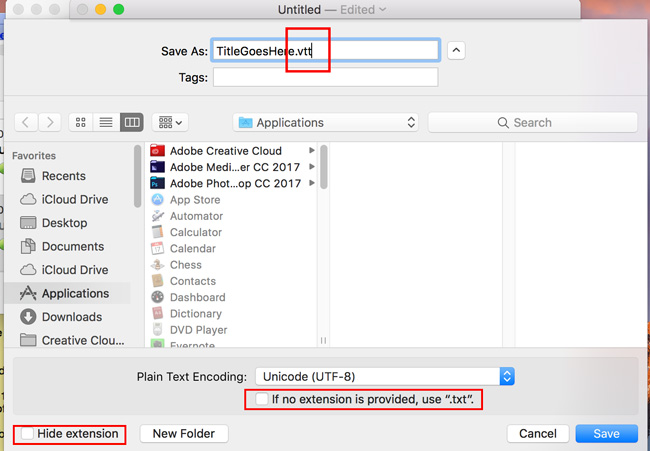
- Then hit save.
- Congratulations! You are now ready to upload your captions.
For Windows users:
- Open a new file on Notepad.
- First, type “WEBVTT” to indicate this is a .vtt file, then press enter twice to leave a blank line. Note: You can include a title or comment before your caption sequence. If you decide to include a comment, either do it on the same line as “WEBVTT” or press enter and start a new NOTE.
- Enter the beginning and end timecode using the following format:
hours:minutes:seconds.milliseconds – –>hours:minutes:seconds.milliseconds - If you choose to add a sequence indicator, such as a “1,” do so on a separate line above the timecodes. Then press “enter.” Note: To add cue settings, put a space between the second timecode and add position, size, alignment, etc.
- In the next line, begin your captions. Try to keep a 32-character limit with 2 lines per caption so the viewer doesn’t have to read too much and the caption doesn’t take up too much screen space. Also, make sure your captions are compliant with captioning guidelines.*
- After the last text line in the sequence, press “enter” twice. Make sure to leave a blank line to indicate a new caption sequence.
- Here are two examples of the same WebVTT file. You can see how comments, sequence numbers, and cue settings are used.
- Repeat the steps until you have a completed transcript.
- To save, go to File → Save.
- Under “File Name,” type the name of your transcript using “.vtt” at the end.
- Under “Save as type:” select “All Files.”
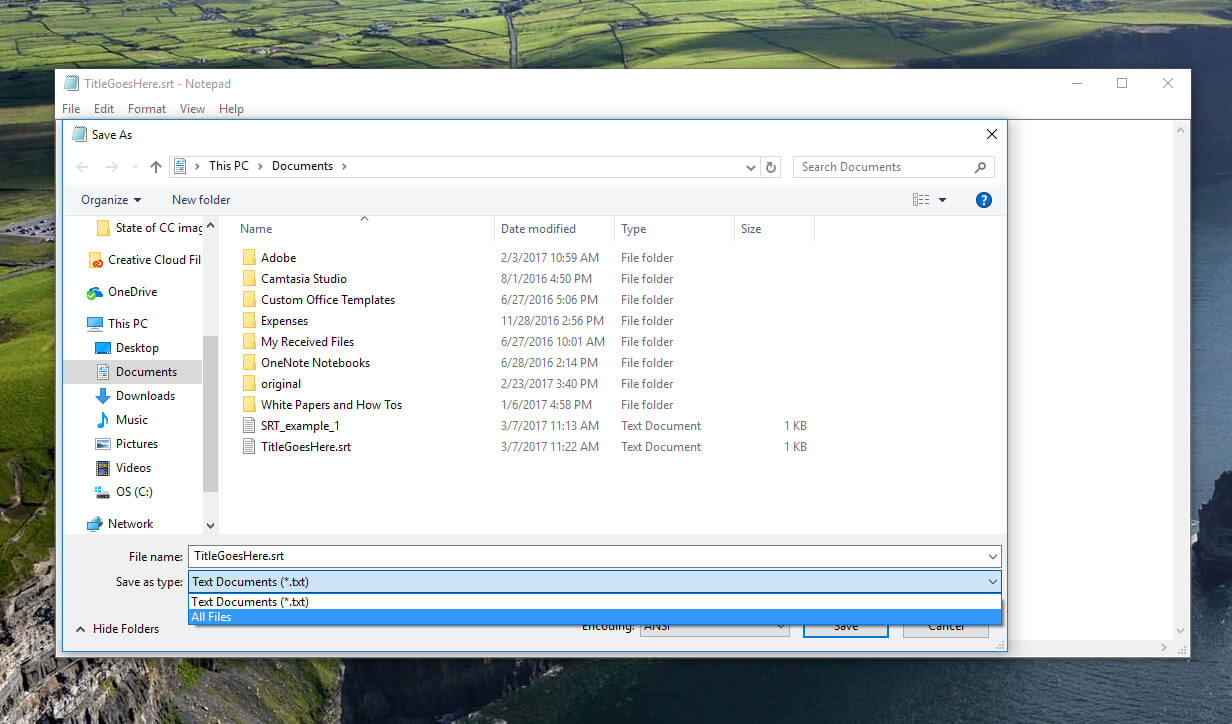
- Then hit save.
- Congratulations! You are now ready to upload your captions.
*For more information on legal requirements and closed captioning guidelines, refer to our white papers:
For online video previously aired on television:
For all federal government and federally subsidized entities who create online video:
Create your own WebVTT Files [Free Guide]
How to upload your WebVTT file
Depending on the media player, lecture capture software, or video recording software you use, the process to upload your WebVTT file will be different. Use the following 3Play Media guides to learn how to upload your caption file.
The downside of creating your own WebVTT files
If you want to create your own captions, making a WebVTT file from scratch is an easy and free option. The only downfall is that you have to create your own timecodes and any other style elements, making DIY captioning a time-consuming process.
How long it will take to caption a video depends on the length of your video, your captioning experience, and the quality of the video. Typically, if you are an experienced transcriptionist, a five-minute video can take 5 to 10 times the length of the video, or 25-50 minutes. If you create your own timecodes and cue settings through a WeBVTT file, this may take longer.
Don’t let the time it takes to create captions keep you from adding captions to your videos. There are numerous benefits to captioning your videos, such as improving your SEO and opening up your content to new audiences, from viewers who are deaf/hard of hearing, to viewers who know English as a second language, to viewers who enjoy using captions.
Though many people choose to create their own captions to save money, if you are captioning many videos or your videos are long, consider hiring a captioning service. With a captioning service, you do not need to worry about timecodes or making sure your captions are compliant. A good captioning service will take care of all the logistics within a reasonable amount of time and offer a 99% accuracy rate or higher.
Before choosing a vendor, make sure you research who will caption your videos and the company’s captioning and transcription process to understand their rates.

This article was originally published on June 30, 2017, by Sofia Enamorado and has since been updated.
Filed under
About the author
Share this page
Related Posts
-
 Read more: AI Dubbing vs. Traditional Dubbing: How Media Leaders Should Choose in 2026
- Dubbing
AI Dubbing vs. Traditional Dubbing: How Media Leaders Should Choose in 2026
-
 Read more: ADA Title II Deadline Extended: What This Means for Public Entities
- Legislation & Compliance
ADA Title II Deadline Extended: What This Means for Public Entities
-
 Read more: 8 Best AI Dubbing Tools in 2026
- Dubbing
8 Best AI Dubbing Tools in 2026